
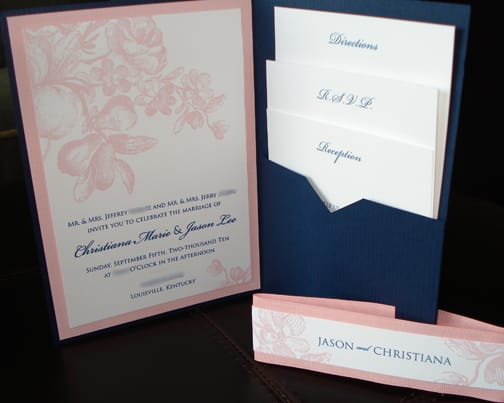
Since I’m a designer I couldn’t have just a simple invitation for our wedding…no, that would have been too easy. I wanted pocketfolds! With Enclosures! And a belly band!

Let me start by saying, there are tons of places where you can buy kits that come with everything pre-printed and pre-cut and all you have to do is assemble them. But I had a hard time paying $2 per invitation when I knew I could make them for less. Also right around the time I was thinking about invitations, the pockefold company discontinued their navy and only had a metallic blue – not at all the look I wanted.
So I ended up buying large sheets of strathmore paper (20×30) and cutting them down to make my own pin-striped navy pockefolds.
BASIC SUPPLIES:
- Cutting board (I use a self-healing one)
- Metal ruler & pencil
- Exacto-knife, extra blades & scissors
- Scrapbooking paper-cutter with a “score” insert
- Glue sticks & double stick tape
- A month’s worth of weekends free
- Patience…lots of patience

FOLDERS
I wanted my finished invitations to be 5 x 7 so I cut the paper into 10 x 7 rectangles. Then I marked the center, scored and folded each sheet and put them under a book to press them flat while I was making the pockets.

POCKETS:
Figure out the height you want your pockets to be and the width of one side of the “folder”. My finished invites were 5 x 7 so my pockets needed to be 6 x 3.5 (5 x 3 finished with 1/2″ on either side and the bottom to affix them to the folder).
To make the process easier I just drew a template and marked where the score lines would need to be, that way I didn’t have to measure every single pocket. You can see I added a little notch to the center but you could use an edge punch to create something more fancy.

Next I scored the pockets on the lines I’d marked, snipped off the corners and folded them along the score lines.

POCKETFOLD ASSEMBLY
Next I used doublestick tape along the folded edges and attached the pocket to the invitation…BUT after I’d done a handful I noticed that the tape was starting to come unstuck – OH NO! So I switched to a gluestick and weighted them under books while the glue dried.

ENCLOSURES
We had the invitation itself and 3 enclosures to include (Directions, Reception and RSVP cards). I also had a printed bellyband that went on the outside of the invitation. I was able to fit everything for one invitation on 2 sheets of paper.

Sizes were as follows:
Invitation = 4.25 x 6.25
Invitation Mat Paper (pink) = 4.75 x 6.75
Enclosure 1 = 4.25 x 6.25
Enclosure 2 = 4.25 x 5.5
Enclosure 3 = 4.25 x 4.75
Then I trimmed out all the pieces and scored the RSVP cards (so they’d fit in our envelopes).

I also used grosgrain ribbon as a backing for our bellyband so I cut those all to fit.

ASSEMBLY
Lay everything out in order and assemble! I still ended up with some left over pieces, not sure how it happened but at that point, there wasn’t much I could do.

ALL THE FINISHED PIECES:


No Comments